

Stitching on Wool and Felt — Journal Covers and More
Stitching on Wool and Felt — Journal Covers and More
Stitching on Wool and Felt — Journal Covers and More
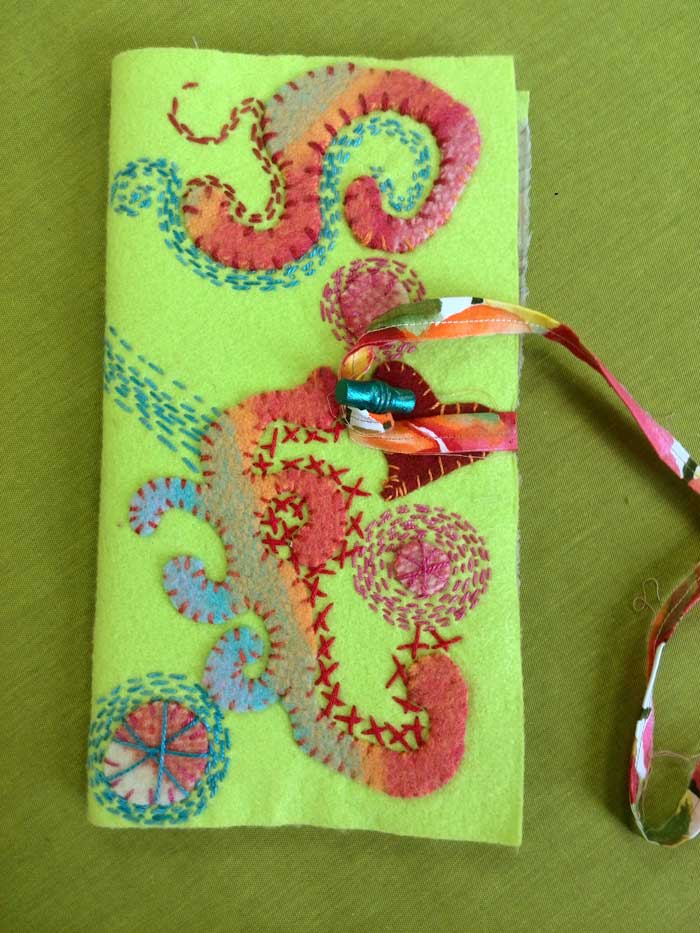
Several years ago during the holiday season I wrote about creating felt-covered journals (my tutorial is expanded on below). I mentioned that I generally batch or make multiples of art, in that case making four journal covers at one time... a great process for making gifts! I’ve realized I hadn’t shared the cover (pictured above) of the journal I kept for myself, and so in celebration of February being National Embroidery Month, am sharing some of my stitching here.
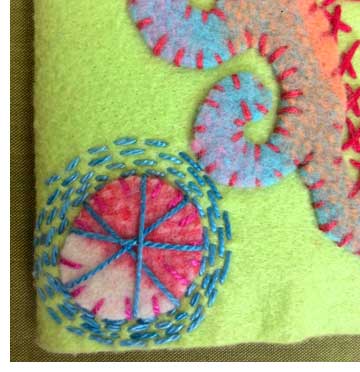
Pictured above, and stitching detail photo right, is the finished hand-stitched felt/wool mixed media journal cover. Natural fiber felts are perfect for needlefelting (by hand or machine), or as a base for hand-stitching.
Plus, in addition to commercial felts, I enjoy using upcycled wool sweaters and fabrics that have been “fulled” (washed in hot water and dried to shrink and tighten the fibers) as a base for switching. You can see the fun striped sweater created a beautiful accent!

Above, commercial felt and fulled wool sweaters were used to create my journal cover. I simply cut simple shapes to add, plus traced a more elaborate scroll design to appliqué to the base felt fabric. These shapes were accented with blanket stitching, simple straight stitches, running stitching and cross-stitching.

WonderFil Specialty Threads feature a large number of beautiful threads, such as Sue Spargo's collection of Eleganza, perfect for hand-stitching. Here, WonderFil Specialty Threads embellish wool hearts on an upcycled sweater swatch. Above left features French knots; right are Bullion knots (use a Bullion Knot Needle for ease in creating these). Also pictured below, these stitched hearts are an example of a project demonstrated and completed during our monthly Hand Stitch Third Thursday sessions.

I am always touting Modern Hand Stitching by Ruth Chandler: it’s a wonderful resource, giving you well-illustrated instructions on creating basic embroidery stitches. The fun of the book is how she shows you many ways you can adjust and alter those stitches for a new look. Artistic Artifacts also carries a number of other beautiful embroidery books complete with instructions, patterns and projects.

This blog post is giving you instructions to create a mixed media journal, but imagine the above pictured examples (more of my hand-stitching on wool) instead sewn into a zipper pouch... wouldn’t that make the perfect storage for your favorite thread spools? Or how about working larger, or stitching together different squares, to create a pillow? Your only limit is your imagination!
Creating Mixed Media Journals
Select your commercial felt base or fulled wool swatch. The bright light green pictured here is XoticFelt, which came as a large 20" x 22" swatch. I folded it in half, ironed the fold line, folded it in half again and ironed that fold.
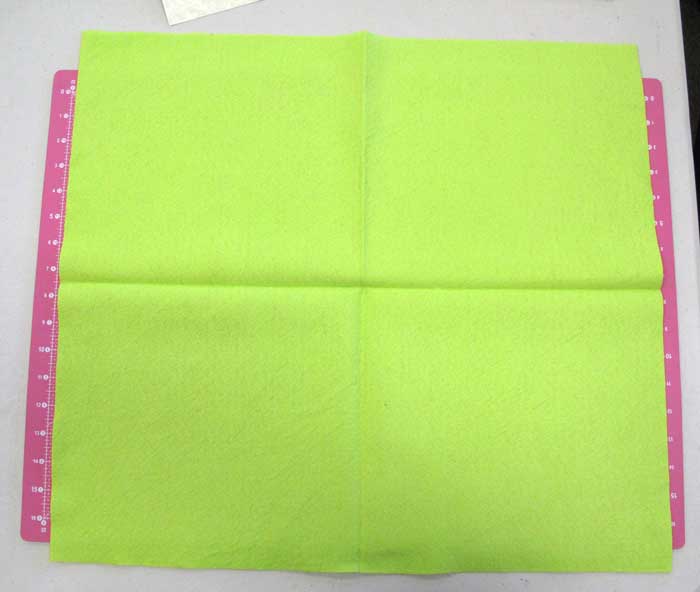
Doing this created easy to follow cutting lines to cut my four book covers. Because I was “batching” my work to create multiple journals to use as gifts, I used the entire piece and these covers measured 10" x 11". This was a bit unusual in size, but I didn’t waste any felt! Of course you can choose to make your cover in any size you like.

The next step is to cut a backing for the felt. This surface will serve as your inside front and back cover. My favorite to use is Roc-lon Multi-Purpose Cloth™. Comparable to canvas, this 70% Polyester/30% cotton material is flexible, soft, and prepared for painting and collaging. Using it makes your felt cover sturdier and more durable. Cut the Multi-Purpose Cloth (or your desired material) the same size, or a bit smaller than the size of the felt.
You will also want to cut your choice of found papers, and cards to go on the inside of the book. You can cut all your paper for your page signatures the same size, or you can, like in my example, incorporate different sizes for interest.
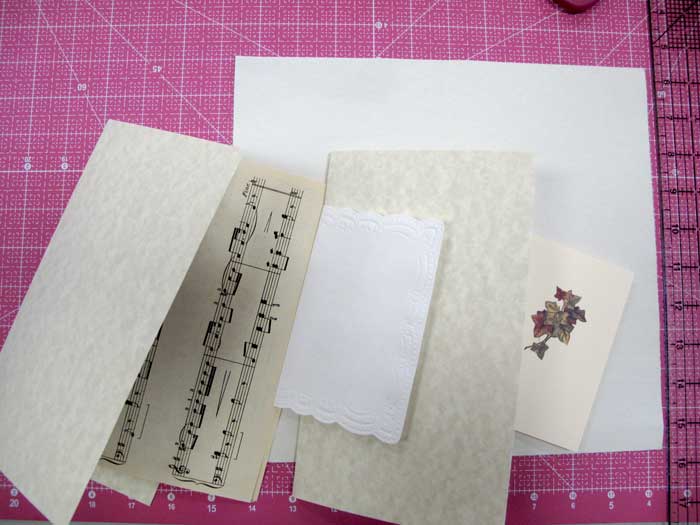
This is an ideal way to recycle junk mail, wrapping paper scraps, and more. You can also incorporate sheets of fabric into your pages as I did. If you do, you can stitch inside your book, or pin or fuse items to the fabric. The sky’s the limit!

You now have three elements working: embroidered felt or wool for the front cover, Multi-Purpose Cloth for the inside cover, and your pages.
Front Cover:
Cut small pieces of contrasting felt to create a design, and hand-stitch with floss using straight or embroidery stitches. I’ve included a photo here of a different stitched book cover I created for additional ideas — I love stitching on buttons! As noted above Artistic Artifacts carries a number of hand-stitching and embroidery books, plus there are a huge number of online and YouTube resources for learning embroidery stitches. You could also choose to machine stitch your cover — a great opportunity to practice free-motion quilting!
Inside Cover:
Next is the Multi-Purpose Cloth. You can leave this plain/white, or create some surface design with paint or inks. I’ve used stencils and spray inks to quickly pattern the inside cover of the Multi-Purpose Cloth.

When working with spray inks, make sure your work surface is well covered, or place your item in a box. In the photo examples here, I have used a red plastic tablecloth to protect the table surface, topping it with tissue paper.

I add the tissue paper because then it builds my stash — I can use any of the oversprayed tissue in other mixed media projects! Spray your first color of ink lightly through the stencil.

After I lifted the stencil off, I let it dry (spray inks dry quickly) and then continued the process, spraying all four of my Multi-Purpose Cloth at the same time, using different colors of ink. I also added a small stencil and used another color ink. Let dry.


To continue, the non-sprayed or plain side of your Multi-Purpose Cloth needs to have Mistyfuse applied to it. I’ve often mentioned using Mistyfuse in projects; you know I love it! But remember, it requires the use of a Goddess Sheet, the Bo-Nash Amazing Sheet or any brand of non-stick (Teflon) craft sheet (parchment paper will also work) to cover the surface while ironing. Pictured here, the plain side of my Multi-Purpose cover has a layer of white Mistyfuse (hard to see, I know, but you can pick up the webbing texture) that is being covered by the non-stick sheet. I iron on top of the sheet, which fuses the Mistyfuse to the interior covers.
Once the Mistyfuse has been applied, all the pieces are ready:
- Outside Cover: the felt has a pattern and color stitched to the front.
- Inside Cover: the Multi-Purpose Cloth has color on one side (or was left plain) and Mistyfuse on the other side.
- Pages: Paper and fabric is assembled for the interior of the book.
Stitching & Embellishing Pages:
Stitch the paper to your inside cover Multi-Purpose Cloth. I found the center by simply folding all the papers and fabrics. I also folded the Multi-Purpose Cloth and lined everything up according to that fold — remember, your color side faces up so it is visible — and straight stitched down the center.

Set your sewing machine to sew a long, straight stitch — shorter stitches too close together can cause the paper to perforate and then fall out.

These mixed media journals are also a great place to use your favorite washi tape: apply the tape over the stitching (above) to hide it if you prefer. Washi tape is also a simple and decorative way to create fold out pages and pockets.

Finishing Your Mixed Media Journal:
Your last step is to fuse your stitched felt cover to the plain side of your Multi-Purpose Cloth interior cover — which has already had the Mistyfuse applied. Trim your edges if it’s necessary.

You can add finishing touches like a button closure and an attached fabric tie, as in my example. Pictured below is my journal opened to show both the front and back stitching and how the fabric tie was stitched on.

Finally, enjoy your new journal... and if you have batched your construction, enjoy giving away these special gifts!
 Email Judy Gula or learn more about contacting Artistic Artifacts.
Artistic Artifacts has been selected by Feedspot as one of the Top 100 Quilting Blogs!
Categories
Popular posts


Leave a comment