

Fun with ByAnnie!
Fun with ByAnnie!
Fun with ByAnnie!

Join me in welcoming Katherine Nichols to the staff of Artistic Artifacts — I’m happy she’s sharing her experience of creating a ByAnnie bag with us!
Guest post by Katherine Nichols
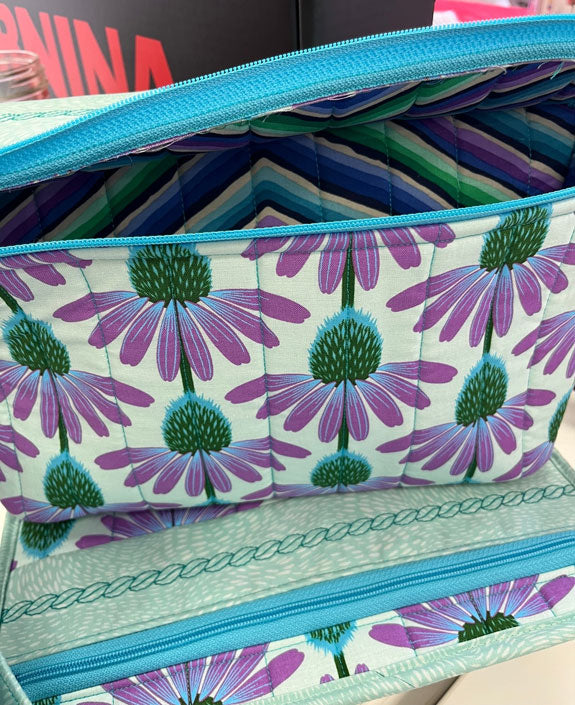
The Travel Essentials 2.0 bag pattern from ByAnnie is the perfect project to show off Anna Marie Horner’s Echinacea fabric and Kaffe Fassett’s 85 and Fabulous Blue Chevron print. With the happy prints, accent zippers, and specialty stitching, the bag really stands out. While the bag is perfect for travel, it could also be used to carry hand stitching and sewing supplies. The mesh pocket would be perfect for threading your spools of thread through to contain the spools while on the road, and other pockets can contain paper piecing templates, glue sticks, scissors, tools, and supplies.

This bag was my first experience sewing a ByAnnie pattern and I’m really pleased with the professional looking finished product. The inside seams are finished, hardware is conveniently attached to make the bag very serviceable, and the ByAnnie Soft and Stable stabilizer provides the bag with its shape. The Travel Essentials pattern is clearly written, has diagrams for each step, and provides links to helpful online tutorials for certain steps. I recommend this pattern for an experienced intermediate or advanced sewist.
Artistic Artifacts has the fabric and all the other supplies needed for the bag, as well as BERNINA machines and presser feet. I used my BERNINA B570 QE, which worked beautifully. I wanted to share a few tips if you’d like to make your own:
Supplies — I needed all the supplies listed in the instructions, including a nonstick/Teflon presser foot, Wonder Clips, removable marking tools in both a light and dark color, a stiletto, washable glue, and a fabric tube turning tool and bodkin.
 Cutting — The Echinacea print is directional, so I was careful to cut with the design oriented vertically. I centered the chevron print. The pattern includes a sheet of labels to cut out and pin to each piece as you cut it, and it’s very important that you label the many pieces. (I’ve included a photo of what my labeled cut and quilted pieces looked like.)
Quilting — I used my BERNINA walking foot to do the quilting for the main body and some pocket pieces. I marked a vertical line in the center of the pieces to be quilted, quilted that line with the walking foot, and then used the guide bar included with the walking foot to evenly space the other lines of quilting. I used a stitch length of 3.25, and the walking foot made quilting through the foam very easy. Both quilted pieces were larger than needed, so I was able to center the fabric designs on the pieces as I cut them out.
Sewing with Vinyl — Two of the pockets are made from vinyl, which can stick to your machine feed dogs and presser feet while sewing. When sewing with vinyl on the top (fabric or zipper tape underneath), use a BERNINA presser foot with a non-stick sole such as a #52/52C/52D zigzag foot or #53 straight stitch foot. When you sew with the vinyl on the bottom, stitch through a piece tissue paper placed under your work to prevent the vinyl from sticking to your machine bed. The tissue will easily tear off after stitching. I used one full sheet of tissue paper for this project.
Decorative Stitching — I added decorative stitching to the Pocket D Border piece (which shows on the outside of the bag), and the Pocket E Facing piece (which shows on the inside). I tested several of the decorative stitches on my machine, and decided on stitch #167 because I didn’t have to worry about centering the stitching design on the pieces. I used a 12wt thread (examples include solid colored Spagetti and variegated Fruitti from WonderFil Specialty Threads) and a size 100 needle to make the stitching more visible, and inserted heavyweight stabilizer under that fabric as I stitched.
Below are photos of the Travel Essentials bag hanging both closed and open, plus a shot of me at my machine sewing it. I enjoyed making this, and as a bonus, I have enough fabric, stabilizers, and hardware left to make a ByAnnie Clam Up zippered pouch!

 Email Judy Gula or learn more about contacting Artistic Artifacts.
Artistic Artifacts has been selected by Feedspot as one of the Top 100 Quilting Blogs!
Categories
Popular posts

Leave a comment