Block Printed & Slow Stitched Quiltlets

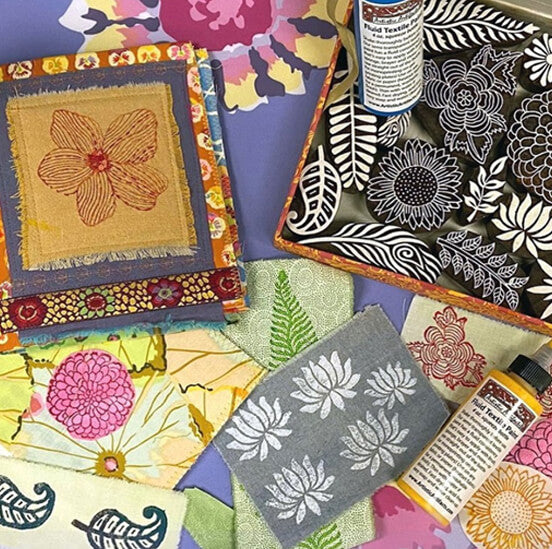
We recently welcomed a customer in the store and discussed some of the modern stitching methods, such as the Stitch Meditations we wrote about last week. She fell in love with one of my projects, which is displayed with our wooden printing blocks, and I realized this was the perfect opportunity to update you on the completed project, published in progress in June 2015.
The Slow Stitching Movement has become very hot over the last couple of years. Mark Lipinski modeled it after the international Slow Food movement, open to all fiber and needle artists to prepare them for a higher form of creativity and important work in the needle and fiber arts.
I have really enjoyed renewing my acquaintance with hand stitching! I was inspired by my stitching gurus, Liz Kettle of Textile Evolution, and renowned stitch/fiber artist Ruth Chandler, both of whom were interviewed by Mark about the Slow Stitching movement.

Another catalyst for my renewed interest was the publication of Ruth’s book Modern Hand Stitching, which gives you instructions for how to create basic stitches, and then shows the multiple ways you can use and alter it for a fresh new look. It is amazing! Now I comb through used book stores looking for European hand stitching books — especially the Scandinavian ones. It’s official...I am hooked!
At one of the monthly Judy’s Altered Minds (JAMs) meeting, a show & tell project by member Karen Scudder caused such a stir that she was asked to give the group a short demo at a future meeting. Karen had used a creative hand stitching and quilting technique often attributed to Teesha Moore (see the end of this post for more info and tutorial links). That demo has led to many little hand stitch quiltlets appearing at JAMS meetings, and a number of dedicated new fans of the process!

Not wanting to be left out of the fun, and wanting to use the samples I have accumulated from many block printing demonstrations using our wooden printing blocks and Artistic Artifacts textile paints, I embarked on my own slow stitch project! Here’s my method:
I used shirting fabric samples as my backing — despite giving literally scores of them away over the years, I still have a huge number remaining! Using these samples also gave me a starting point as to the size of my blocks. I matched up the stamped fabric with backing of cotton shirting approximately the same size. For this technique, it’s often recommended that your backing fabric be a bit larger, so it can be turned over to the front to create the distinctive rolled edge.

I used Nature-Fil™ Blend quilt batting (a blend of bamboo and rayon; stitches beautifully) and cut it slightly smaller than my front and back pieces of fabric. See the beginning of my quilt sandwich above.
Step 2 is to stitch around the block, by hand or machine (example right), to hold the pieces together. While it is possible to skip this step, I have found it does help stabilize it all for the subsequent steps.
The next step is to roll the edges and stitch around them, as shown in the photo below of quiltlet blocks ready to be embellished with hand stitching.


Once you have your small quilt or quiltlet put together, it’s time to break out your floss and stitch away, using as many embroidery stitches as you desire. For this project I kept it simple with variations of straight stitching using a variety of threads and floss.

You use the same hand stitching to join individual units together, as seen above. These quiltlets can be joined together in stages, so you can always add to a project if you want to.
I have seen examples that are done with more precision, and they are beautiful too... for mine, I didn’t worry about the units lining up accurately — in fact I welcomed the free form nature of it. Another in progress view:

Many people choose to add buttons, beads and charms too. Note that that kind of additional embellishing should take place after you have stitched the block completely — your stitches shrink the entire block somewhat; beads applied too early in the process could loosen or pucker.
This is a fun and portable project — as you can see in the bird block pictured above, I carried the needle with me everywhere!
And now, finished!
After beginning this in 2015, I continued to enjoy adding to my project. I knew I wanted to join the blocks together to create something, but when I began wasn't sure what that something would be. I considered a journal cover as Teesha has done, but ultimately had so much fun I just kept going, enlarging and embellishing to end with a wall hanging.

Adding to my enjoyment was the fact that Artistic Artifacts is now a WonderFil Specialty Threads “Threaducation” Center... so I have even more yummy threads and fibers to use! Variegated threads like those from Sue Spargo's collection of Eleganza are beautiful.
Pictured below, I added some beading for another pop of color and texture.

My completed wall hanging, below. I encourage you to try this technique for yourself... it really is addicting! Scroll down for instructions by the originator of this method, Susan “Lucky” Shie, and a YouTube tutorial for a fabric journal by Teesha Moore, who popularized Susan’s technique.

More About This Method

Susan “Lucky” Shie (pronounced “shy”) is an amazing artist, and created a number of heavily stitched and embellished art quilts featured in Quilting Arts and elsewhere. For years she taught her methods; in 1999 she taught a class in her techniques that included Teesha Moore (see Susan’s online diary, scroll approximately halfway down the page). Susan wrotes that Teesha, “...who had never made fabric art before, took to it really fast! She is primarily a stamp artist and journaler, who self publishes a wild stamp art quarterly. Her ability to translate her creativity over to fabric textures was wonderful!”
Although Susan ceased teaching this in 2006, she documented her methods in writing and continues to keep that tutorial online. Learn this fun technique from its originator by visiting the Lucky School of Quilting Techniques »

With Susan’s permission, Teesha and others began teaching their own takes on this stitching technique, using it to make art dolls, fabric journals and more. Teesha offers a free set of tutorial videos to create one of her fabric journals, constructed from units she calls pillows. (Teesha stuffs her fabric with polyfil stuffing, rather than using batting.) Watch these videos for her own methods on constructing a sewn and embellished fiber art book:
P.S. As you may know, Teesha suffered a stroke in April 2017. In June Tracy Moore, her husband, posted the following good news on Facebook, that she “keeps improving day after day. She is bright, funny, and beautiful. She continues to inspire me every second of every day. She is working hard on gaining her strength back in her right arm and hand so that she can whip up new wonderful art to share with the world soon.” Please send her positive vibes for her continued recovery!




Leave a comment