

Embellishing Vintage Glass with Shells, Relics & Artifacts
Embellishing Vintage Glass with Shells, Relics & Artifacts
Embellishing Vintage Glass with Shells, Relics & Artifacts
First, a big thank you to all the folks who braved the near-hurricane and the flooding to make it to the Virginia Beach edition of Art & Soul and shopped with me! We always talk up the beach-front location, so the weather certainly wasn’t ideal, but the great teachers, students and beautiful art were enough to sustain us!
I have been having fun with the Relics & Artifacts designed by Sandra Evertson since they first arrived in the shop. I have been following Sandra on her Facebook page and fell in love the work she posted earlier this year using her archival casts and sea shells:

Stunning, right? Of course with these as inspiration, my imagination ran really large! But I reined in that first impulse and instead began small. I found a vintage clear glass spoon holder in my studio and decided to use that to apply some selected Relics & Artifacts and shells from my own collection.
First I decided that I wanted to add a bit of color to my pieces.
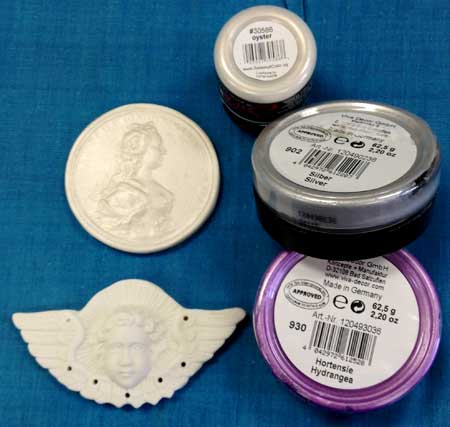
I used the following: Silks Acrylic Glaze in Oyster (top left in above photo; also already applied to the large circle cameo (the as yet uncoated angel is from the Archangels set). I also used Inka Gold products: a bit of Silver (middle left) and and then the pretty Hydrangea shade to complement and pull out the the pink color naturally present in the sea shells. The Inka Gold products were applied and buffed in and off until I got the effect I wanted.

To adhere the Relics & Artifacts and the shells onton my vintage glass, I used small bits of Apoxie® Sculpt. This is a two-part adhesive putty that is easy to mix: simply measure equal pieces of Part A and Part B and knead them together thoroughly for a couple of minutes. I mixed up small batches, because it’s quick to do so, but because you have a working time of 2-3 hours before it begins to cure and thoroughly harden, you could mix up one batch for most projects.

I could have used the Apoxie Sculpt to completely cover the outside of the glass (mixed it has a consistency much like clay), but instead opted for small pieces (which you can see in the above photo shot from the inside of the glass) to illustrate that just a little bit holds like cement!

Apoxie Sculpt is much better than a glue, even including the old reliable E6000. It stays in place when working on a non-flat surface, and the item doesn’t slide out of position. And it can be used on a wide variety of surfaces: in addition to the glass I have here, you can use it on plastic,wood, metal, ceramic, glass, polymers, foam, fiberglass, etc. Artist Leslie Brier, who often teaches for us (next up: Collage Treasure Necklace on October 13), introduced us to Apoxie Sculpt, as she uses it on all of her mixed media sculptures/asseblages, such as her recycled robots.

Above is what I have accomplished so far with this display piece. My plan is to completely cover the remaining spaces on the outside with shells, and paint the inside (to hide the Apoxie Sculpt). Once the interior is painted and dried, I will likely add even more shells inside.
 Email Judy Gula or learn more about contacting Artistic Artifacts.
Artistic Artifacts has been selected by Feedspot as one of the Top 100 Quilting Blogs!
Categories
Popular posts

Leave a comment