Make Your Own Travel Accessory!
Traveling... Do you travel for business? (If so, then does everyone then think that you are having fun, rather than working?) Do you carry on, or check your bag? Traveling is getting more difficult if you are riding in economy. Packing must be more compact and better organized.
Having just returned from Art & Soul in Portland Oregon, where Artistic Artifacts was the onsite store, I had to deal with a jumble of wires and power cords for various computers, receipt printer, camera, Kindle, etc. There has to be a better way!
And there is! Liz Kettle of Textile Evolution brought out her beautifully made charger/cord organizer. I quickly decided we should post her tutorial on how you can make one too! Special thanks to Havel’s (makers of quality scissors) and Liz Kettle (the best roomie).
Remember that Liz will be visiting Artistic Artifacts next month and teaching several of her favorite classes with us as part of our celebration of the Studio Art Quilt Associates (SAQA) 25th Anniversary Conference taking place May 1-4 in Alexandria, VA. We have created a robust week-long schedule of fiber and surface design classes and events, open to all! Travel in for SAQA, or our classes, or both — and bring your new charger organizer with you!

Fully Charged Organizer
By Liz Kettle
Do you ever get to your vacation spot or business conference and realize you left a critical charger cord at home? Ugh! This has happened to me too many times. There are a few charger organizers on the market but they weren’t perfect and they were just a tad too boring in design. So, I did what any creative maker of stuff would do and designed a charger organizer that fit my unique charger needs! Best of all, it is a quick project and I had it ready to go for my next trip.
Multi-Purpose Cloth™ by Roc-lon®, (aka MPC), is a white non-woven canvas that is perfect for this project because it doesn’t fray, is sturdy and just heavy enough to give the organizer body. I use it for all sorts of bags, totes, placemats etc.
Heavy canvas or felt may be substituted but will give a different look and feel. Canvas will ravel so all the edges will need to be stitched tightly.
Charger/Cord Organizer Tutorial
You will need the following supplies for Charger/Cord Organizer:
- Multi-Purpose Cloth or canvas/heavyweight fabric~ 16" x 12½"
- Decorative fabrics ~ 2 pieces 16" x 12½" (I used a Japanese linen print)
- 4 feet of 1" wide ribbon or twill tape for closure
- 14" of double folded seam tape
- Plastic for pockets (medium thickness)
- ¼" wide elastic ~ 14" length
- Mistyfuse or other fusible web
- Rotary cutter and mat
- Havel’s Teflon scissors
- Sewing Machine
To design and sew your organizer, follow these steps:

1) Using your rotary cutter and mat, cut the MPC, Mistyfuse and fabrics 16" x 12½". Layer the MPC, the Mistyfuse and the outer decorative fabric. Follow manufacturer’s directions to fuse together.

2) Repeat with the inner decorative fabric layer to cover both sides of the MPC. Set this aside for now.

3) Cut a piece of Mistyfuse ½" wide x 14". Place this inside the folds of the unfolded seam tape. Use a non-stick craft sheet and iron the tape to fuse the inner folds flat.

4) Pin in the 14" of ¼" wide elastic to the back side of the seam tape.

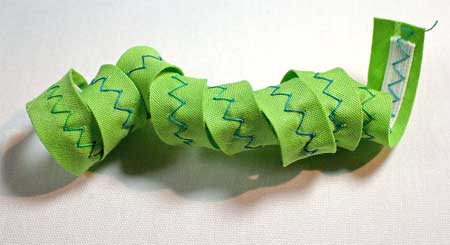
5) Pin the elastic evenly around the tape while stretching to fit. When you are finished it will look like the above photo.

6) Use a zigzag stitch to stitch the elastic to the seam tape.

7) When you have finished sewing, the seam tape will curl up, as shown in the above photo.

8a) Use a permanent marker and a ruler to mark the plastic.

8b) Use Teflon scissors to cut a piece 20" x 5".

9) To personalize your organizer, place the specific charging cords and devices on the base of your organizer. Place the plastic over these. Begin on one end and pin the plastic to the edge. Then smooth the plastic between the cords to allow for the depth of the pocket and pin the bottom and top of the plastic onto the base fabric. Trim off the extra plastic with your Teflon coated scissors.

10) Remove the charging devices and mark the pin placement on the plastic on the bottom edge so you can realign it later. Mark the fabric as well or measure and record on a piece of paper. Remove the pins and plastic.

11) Place the seam tape along the top edge of the plastic, stretching to fit and stitch in place with a zigzag stitch.

12) Place the plastic back on the fabric and re-pin the plastic in place along the sides and bottom. Create small pleats or folds along the bottom edge of the plastic to make the pocket depth needed for the cords. Pin these in place. Stitch along the side and bottom edges with a straight stitch.

Note: If stitching on the plastic is difficult, use a Teflon foot, or simply stick a piece of tape on the bottom of your foot. This will help reduce drag from the plastic.

13) Stitch the pockets from the bottom of the plastic up to the seam tape covered edge using a straight stitch. Stitch back and forth a couple times at the top to reinforce the top edge.
14) Stitch around all the sides with a zigzag stitch. I like to use a multicolored thread, and stitch around the edge multiple times to blend the thread colors. You can also use a satin stitch around the edge for a more finished edge.
15) Fold the wrapping ribbon or twill tape in half and place the fold on the middle of the top edge of the organizer on the outside. Stitch the ribbon securely with a zigzag stitch. I usually stitch it 2-4 times.

16) Place your charging devices and cords back in the plastic pockets.

17) Roll the organizer up from the bottom edge and wrap the ribbon around to tie. Trim ribbon as necessary.
You are now ready to travel anywhere fully charged!
About Liz: Liz Kettle is a mixed media and textile artist living in Colorado. Liz is author of First Time Beading on Fabric and she is co-author of two books, Fabric Embellishing: The Basics and Beyond and Threads: The Basics and Beyond. Liz loves teaching and sharing the joy of making stuff in her articles, classes and workshops. Visit her blog and website, www.TextileEvolution.com, where you can join the fun in her free on-line book studies.


Leave a comment