

Creating Fabric Collage
Creating Fabric Collage
Creating Fabric Collage
Almost a decade ago Judy posted about creating fabric collage and we wanted to share this useful technique again for new readers, or those who missed it the first time around. She began her post writing about finding some surprise free time in her studio, and “really didn’t know what to do with myself.” Joking that she was steps away from having a perfectly clean and organized studio, she instead took the advice of fiber artist Beryl Taylor — start with making bits — and got to work playing with one of her favorite techniques.
Before Artistic Artifacts was a full blown web presence and a bricks and mortar store, I was known for my line of fabric jewelry, including necklaces, earrings, bracelets and pins (pictured above). These were sold at the Potomac Fiber Arts Gallery located in the Torpedo Factory Art Center in Alexandria, VA.  I love to create collaged fabrics. It is relaxing to me, and I have many uses for it, whether cutting it into small bits for my pins or using it to build an art quilt. It’s a great process when you want to be creative but aren’t feeling the pull of a specific project, or if you only have a short period of time to work. To begin my collaged fabrics, I pick one of the several drawers in my studio that hold scraps of fabric sorted by color and take it to my work surface or ironing board. Next I cut a piece of Steam-A-Seam 2 approximately 12 in. 14 in. (Artistic Artifacts sells this by the yard, and Lite Steam-A-Seam 2 is available in a package of five 9 in. x 12 in. sheets.) These are double stick fusible webs, heat activated and pressure sensitive. The fusible is sticky and repositionable, so you can “play” with your design before permanently ironing. I love using Steam-A-Seam 2 for this technique since it holds the fabric scraps in place. I peel one piece of the protective paper off and set it aside. Place the Steam-A-Seam 2 on your work surface, sticky side up. Begin by pulling scraps from your stash, iron them, (honestly, I guess you don’t really have to iron them!) place them on the Steam-A-Seam 2. You can cut them smaller or into shapes as you like. I start my fabric collage in the middle and work out towards the edges. You can begin anywhere you want!
 The fabric scraps should be in one layer, with a minimal amount of overlap. Once your piece of Steam-A-Seam 2 is completely covered with scraps and you’re happy with it (remember, you can play with your positioning), replace the protective sheet of paper over it and iron to hold your scraps together as a sheet of collaged fabric. Pictured above is an example after first fusing. At this point you will need to decide on your backing, depending on what project you plan to use your collaged fabric for. I use muslin if I’m making book or journal covers, and a heavyweight stablilizer such as Pellon 70 Peltex Sew-In Ultra Firm Stabilizer if I’m making postcards, artist trading cards (ATCs) and for my pins. Once you’ve selected your backing, peel off the remaining paper and place the fusible coated side down onto your backing. Iron it to finally fuse.
  I then free-motion sew/quilt my fabric collage sheet. I sometimes choose to place yarns, ribbon, etc. on top, covering it with netting. I don’t worry if it moves around, this is a collage. I frequently have to cut the netting if I'm using it, because it gets caught on my machine foot, but it doesn’t matter! Choose your thread and head to your sewing machine to being the free motion stitching. The fabrics you used in your collage can help with your free motion simply by following the prints and designs already there. But anything goes, as you can see in my example above. Free motion ‘doodling’ is very freeing and a lot of fun!
  Above you can see the reverse of one of my fabric collage pieces that has been free-motioned quilted. The white of the Peltex stabilizer I used is visible shows off my free motion doodling. Since I was going to cut this piece up and finish the back in additional steps, there was no need to have a visible backing fabric in place.
This finished art quilt by Judy Gula began with a fused and quilted base of collaged fabric scraps.
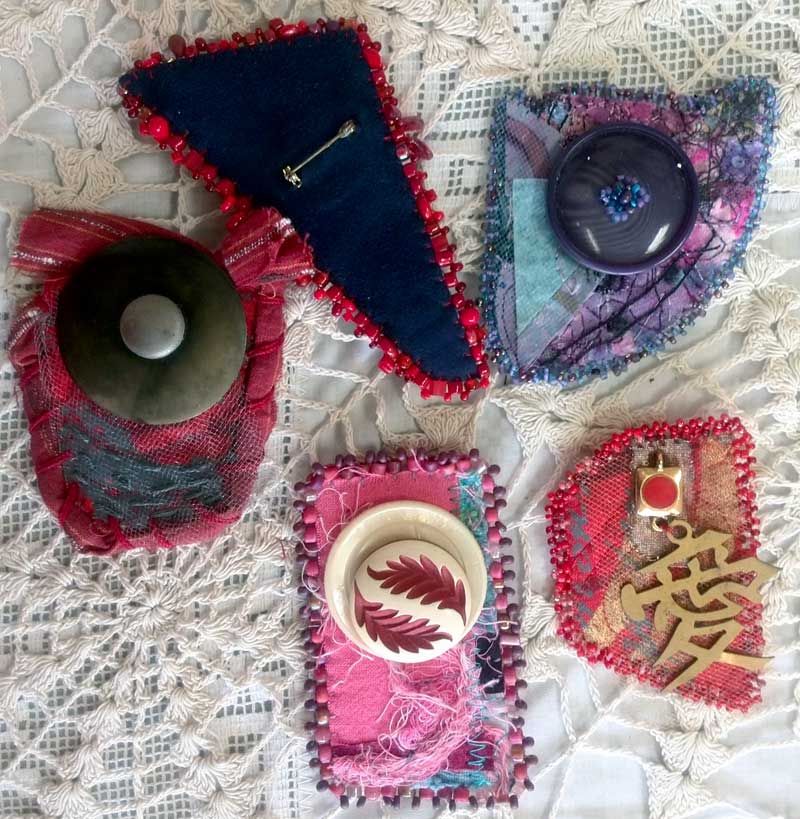
To make my fabric pins, I pull out my vintage buttons, beads, laces, etc., once the free motion stage is finished. I cut the collaged fabric sheet into various shapes and pieces to begin my pins, then start the layering and embellishing steps.  While the fabric collage process can be fast and fun, yes, these pins take a little longer than a free afternoon of found studio time! I face the back with ultrasuede, attach a pin backing (you can see the ultrasuede and pin backing in the photo that opened this post), and finish the edges, usually with rows of beading and beading stitches. The black and white fabric collage pictured here was used to create the pins below. (You know my weakness for black and white fabrics!) In addition to vintage buttons, I used some wonderful buckles.
  These are a lovely little piece of art in themselves, and if you don’t wear pins, they also make wonderful quilt or mixed media art embellishments or focal points. A gallery of some of my favorites (click to see larger views):

Categories
Popular posts


Leave a comment